In my opinion, Blogger, also commonly known as Blogspot, is the best free
blogging platform that is available on the internet. One of the features
which makes Blogger stands out the most is its AdSense compatibility.
Once your Blogger website is approved by AdSense, you may begin to
display multiple advertisements on your blog. Advertisements will start to
appear on your Blogspot after you put AdSense code in the correct places.
Generally, ads will be displayed on the body of your blog and inside your
published posts. There are two methods in order to place advertisements
using AdSense.
The first method is AdSense auto ads. This method will let you to display
ads automatically. AdSense will decide the best place where ads can appear
on your blog. It will also decide the amount of ads that can be shown.

The second method is placing ads manually. AdSense will provide you with
several types of ads code in which you can put on your blog. This way, you
can also control the amount of ads that you want to display.
It is possible to use both method simultaneously. I strongly recommend you to use both so
that you can maintain the balance between Ads and user experience. It is
necessary to optimize your AdSense profit without being intrusive to your
visitors in order to avoid
violating the Better Ads Standard.
This article will specifically discuss ads placement using AdSense auto ads
method. If you are curious about manual placement, you can read the Complete Guide on Placing Advertisement in Blogger using AdSense Ad Unit .
Follow and subscribe to this blog so that you don't miss latest update!
How to use AdSense Auto Ads for Blogger
For those of you who have just got your first approval, you will receive an
email from AdSense which tells you that your website is ready to show ads.
The email also contain a little bit information on how to enable AdSense
auto ads.
 |
| Enabling AdSense auto ads |
Follow the following steps in order to enable AdSense auto ads in your Blogger blog:
- Go to your AdSense control panel.
- On the left side of the control panel, choose Ads > Overview > By site.
- You will find your blog being listed in there, click the "edit" button.
- You will be redirected to "Ads setting preview".
- Enable the auto ads from the button located at top right corner.
- Click "Apply to site" button then you will be redirected back to Overview.
- Then choose "Get code", a pop up which contain the auto ads code will appear.
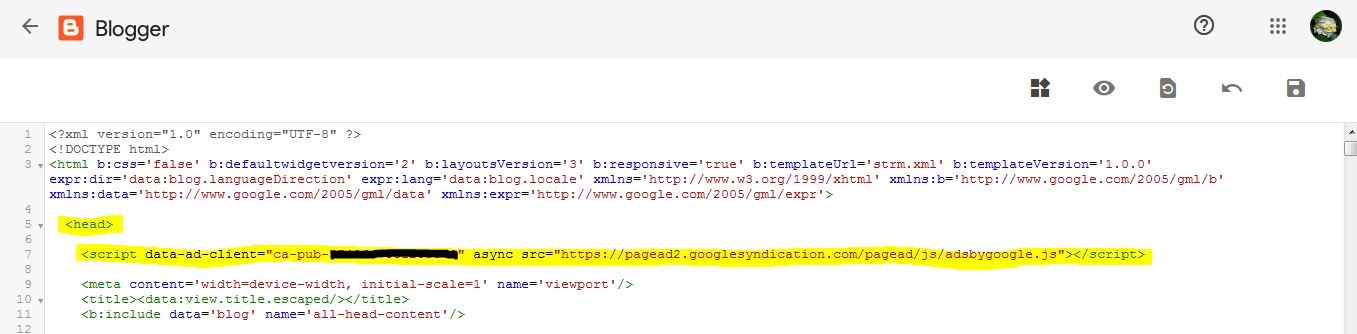
- If you are using custom domain, go to Blogger control panel and go to Theme > Edit HTML.
- Check if the code is under the <head>, it is the same code as the verification code that you get from AdSense when you asked for approval for the first time.
- If it's already in there then AdSense auto ads will appear shortly. If for some reason you can't find it, paste the code under the <head> tag then save your theme.
Over the years, AdSense has improved the auto ads feature. The latest update back in October 2019 has made auto ads simpler to use. Auto ads can work through any AdSense ad unit code which you place manually. You can read about if from AdSense official statement: Introducing the new and improved Auto ads.
 |
| Placing AdSense auto ads code inside Blogger <head> |
In the fourth step, at the Ads setting preview, you will notice that you can preview how ads will be shown in your blog. You will also notice that you can fiddle with Ad formats setting.
There are 4 Ad formats in AdSense auto ads which you can choose to enable.
These ads format are summarize in the following table.
| Ad Format | Ads Characteristic |
| In-page | AdSense will display ads in your blog body and inside your posts automatically. |
| Matched content | Matched content is In-page ads which display ads relevant to the content of your blog post. This ads can only be enabled if you enable In-page. |
| Anchor | This ads usually only appear in mobile phone. The small rectangular ads will stick and float on the top or the bottom of your phone screen. |
| Vignette | This ads also only appear in mobile phone. It pops up and cover your phone screen when you navigate to different page or website once every an hour. |
The Pros and Cons of Enabling Auto ads
Personally, I don't enable In-page and prefer using manual placement. I find
the way these ads are automatically placed to be imprecise. Sometimes it may
mess the up spacing in-between paragraphs thus breaking article formatting.
It makes the posts look untidy and less interesting to visitors.
However if you have a lot of old and long articles which you haven't
monetized using AdSense, placing ads code manually will be very tedious.
Enabling In-page format will be helpful while you slowly tidy up the old
posts.
 |
| Enabling Auto Ads Format |
In-page format is also suitable for those of you who can't be bothered to
manage ad placement by yourself. All you need to do is following the steps
to enable auto ads and enable all format. Then your blog will be ready to
serve ads.
Anchor and vignette should always be enabled. These two mobile only ads are
not intrusive. They will boost your ads revenue because nowadays more people
are using mobile phone.