Blogger's ability to deliver contents is often being underestimated by
creators. There is a misconception that Blogger is not customizable. In fact,
you can create a very reliable and highly personalized website using this
platform.
You are allowed to install custom theme and you have access to HTML and CSS
editor. You can also change the default free blogspot domain into your own
custom domain name. The combination of premium-looking theme and custom domain
will provide you with a very competitive website.
Replacing blogspot with custom domain is very affordable nowadays. In average,
generic domain name such as .com is sold for about $10 per year. Some domain,
such as .my.id for example, is sold as cheap as $1 per year.
Ever since
Blogger's spring cleaning time back in 2018, setting up a custom domain has become much more valuable. The update has
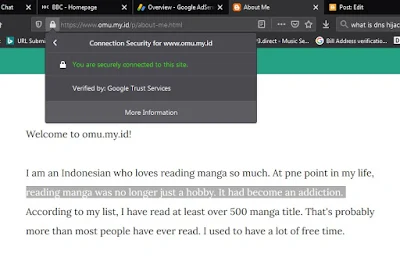
allowed Blogger with custom domain to use secured https protocol.
This is a big deal because https protocol will improve the security, integrity
and confidentiality of the connection between visitors and your website. The
secured https protocol is an element which belongs to page experience. It is
one of Google Search's ranking signal.
Nowadays, I think that using custom domain in Blogger should be the common
practice. It's not difficult to set up and it is cheap. If you want to create
a landing page or serving articles, there is not much reason to buy expensive
and unreliable hosting. All you need to do is buying domain and set it up on
Blogger, and now you will have a professional-looking website.
However, before you proceed to change your domain name you have to consider
several things. First, you need to know
how the choose the best custom domain for Blogger. Once you have made sure that you have the best domain name, you can follow
the following steps in order to replace blogspot with custom domain.
Read also:
How to Index Blogger Post Using Google Search Console Tool - Basic
Search Engine Optimization
Setting up custom domain for Blogger
Blogger new interface which rolled out recently will make the domain
customization process simpler. It is not that complicated to set up. I bought
https://www.omu.my.id not too long ago and I will share my experience on
how to set custom domain in Blogger.
You may be not familiar with some of the technical terms. Fortunately, you
don't really need to know them in detail in order to set up a custom domain.
Beginners will be able to set it up if they follow the instruction.
Follow the following instructions carefully so that your custom domain can be
accessed properly.
1. Buy Custom Domain
There are a lot of domain name providers that you can choose from. Pick the
most trustworthy provider. By default, Blogger will offer you to buy the
custom domain from Google Domain but you can buy it from any providers. In my
case, I bought it from Rumah Web, a trustworthy local company.
2. Go to Blogger Settings > Publishing > Custom Domain
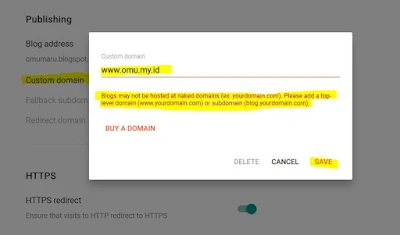
Click the custom domain in the setting and a small pop up window will appear.
Type in the domain name that you have purchased. Please note that you need to
put www in it just like in the picture.
3. Click Save to acquire CNAMEs
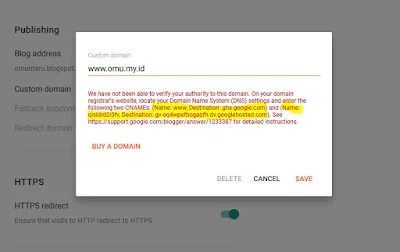
Once you have clicked save, Blogger will give you a warning which says that it
is unable to verify the authority of the domain underneath the domain name. Do
not be alarmed because it is part of the process to generate Name and
Destination. Take a look carefully at the highlighted part of the
picture. For now you need to let it be.
4. Go back to your domain provider control panel and find DNS management
for the custom domain
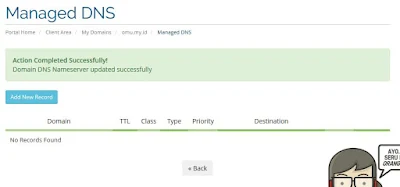
You will need to enter some records to the DNS in your provider control panel.
This process will enable Blogger to recognize that you have the authority to
use the domain name. The interface of the control panel may be slightly
different depending on the domain providers.
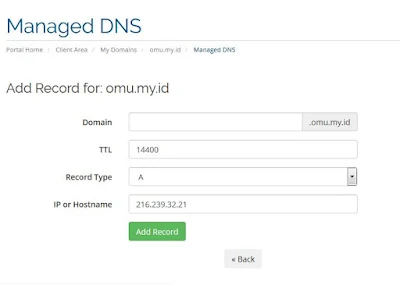
5. Add A-records which point to Google/Blogger IPs
Select Add New Record button. Leave the domain and TTL in default
setting. Select Record Type A. Then put a Google IP and click
Add Record. There are four Google IP which is used when you want to set
up Blogger custom domain. They are:
216.239.32.21
216.239.34.21
216.239.36.21 and
216.239.38.21. Therefore you need to do this step four times for each of the IP. The
interface may be different depending on the domain provider but it is
the same in principle.
6. Add CNAMEs record
From the third step, we have acquired two set of Names and
Destinations generated by Blogger. Put the name in
Domain, leave TTL in default setting. Select CNAME as the record type and put
the destination in Hostname. Do this step twice for each of the name
and destination set.

|
|
First CNAME for www |

|
|
Second CNAME generated uniquely from your Blogger |
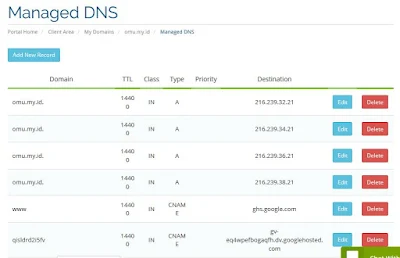
7. Check the complete DNS record
After you have finished adding records, you can check the complete DNS. There
should be 4 type A records and two CNAME records. If your record is incorrect
or incomplete, you can delete it or add a new one.
8. Go back to Blogger and save the custom domain
In the third step, we were unable to save the custom domain because we haven't
added the DNS record. Now that you have a complete record you will be able to
save it. However, sometimes you need to wait for several hours until you can
actually save it because the system is still updating. If you are still unable
to save the custom domain for 24 hours, you may have entered wrong DNS record.
Double check the records and contact the provider customer service. In my
case, I was able to save it after 5 minutes.
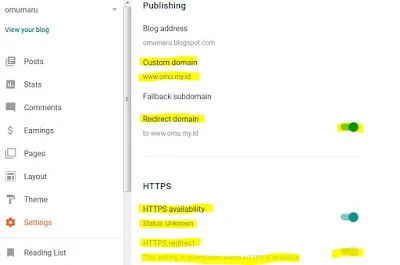
9. Redirect naked domain to www and enable https protocol
You just need to slide the button to the right to enable redirection. Naked
domain or root domain is https://omu.my.id, then I choose to redirect it to
https://www.omu.my.id. If I do not enable it, people will not be able to
access my blog if they use naked domain. You also need to enable HTTPS.
At first the availability status will be unknown, but it will be available
after few minutes. Also, don't forget to enable HTTPS redirect as well so
visitors will always use your website via secured protocol.
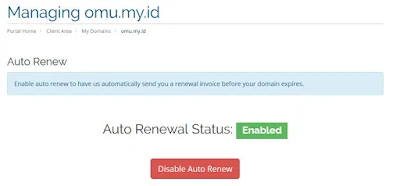
10. Renew your domain once a year
You may lost your domain if someone else decide to buy it if you let it expire
. To reinstate an expired domain is also expensive. Therefore, don't forget to
renew the domain before it's expired. Your domain provider will sent you an
invoice so that you can renew it in time.
Have you decided to use custom domain for your Blogger website? Do not
hesitate to leave a comment below if you find some difficulties when setting
up your own domain.
